This review was updated in January 2026 to add information about the new SkyTrak ST MAX and how it compares to the SkyTrak+. Other updates include pricing information and Course Play simulator software information.
When the original Skytrak launch monitor came out in 2014 it was a little bit ahead of its time. It was one of the first true consumer-level simulator options to hit the market at a price point that was actually accessible for a lot of people.
By the time I got more serious about reviewing golf launch monitors in 2021, the SkyTrak had already been out for 7 years, and was still retailing for around $2k.
With new options from Garmin, FlightScope, Bushnell, and others – my thought (unfounded or not) was essentially: “Technology that is so much more modern is likely going to be much better.”
So because of that, I never made the time to review the original SkyTrak device (these things take a long time to properly review!)
But when the SkyTrak+ was released in 2023, I didn’t waste any time. And I’m glad I didn’t. What I found was a launch monitor that not only held its own in an increasingly competitive market, but one that actually excelled.
Well, now we’ve got the latest SkyTrak evolution, the new ST MAX which was released in late 2025. And with its release, we’ve got the announcement that the SkyTrak+ is being discontinued.
But for as long it remains, you can find the SkyTrak+ at a discounted price that I think makes it extremely attractive relative to the new ST MAX. I’ll talk more about that as we go.
In other words, there’s a lot to cover in this updated-for-2026 SkyTrak+ review.
While most of what follows are my initial reactions to the SkyTrak+, I’ve updated this review to include the current comparison information to the ST MAX as well as new information about SkyTrak’s Course Play simulator software.
Let’s do this.
First Impressions of the SkyTrak+
Opening up the box of the SkyTrak+, everything is well done, but nothing is over the top.
Considering the SkyTrak+ is just shy of $3k (though you can now find it through PlayBetter.com for the discontinued sale price of $1,995), I would have liked it to feel a little bit more from the packaging, but that’s being nitpicky.
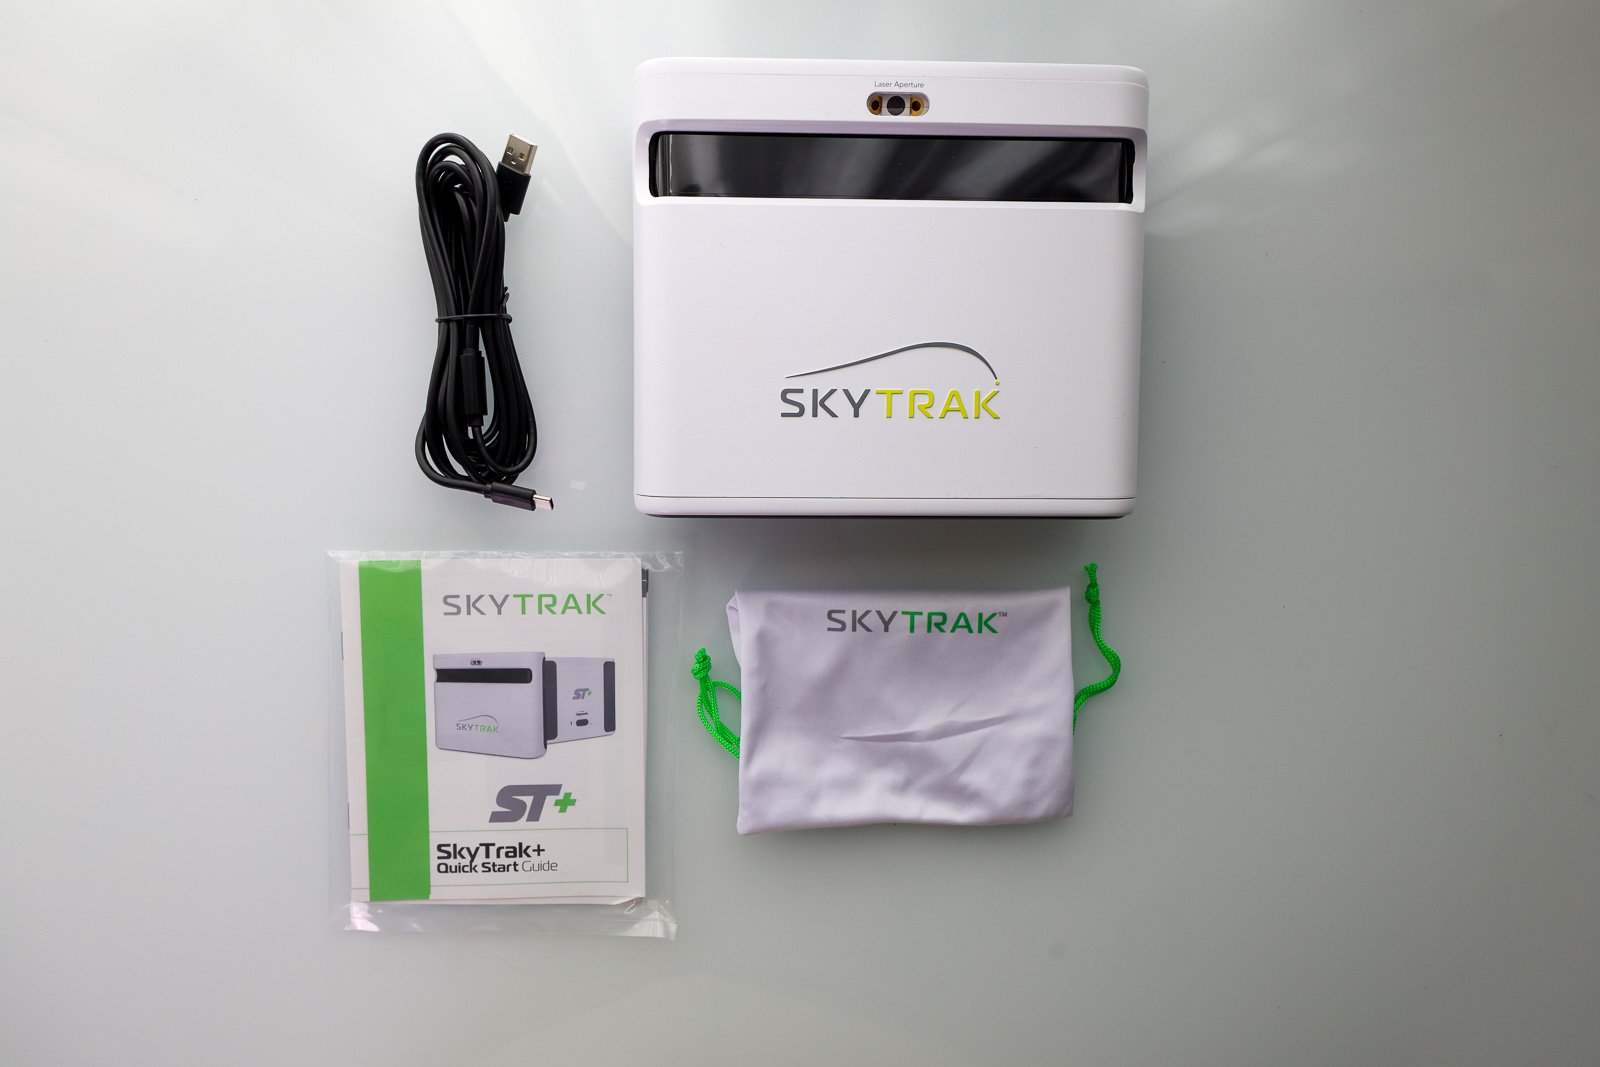
In the box is the SkyTrak+ unit itself, a couple of different USB cables for connecting to a PC/charging, a QuickStart Guide, and a small nylon pouch to keep your cables.
The unit itself is a plastic construction, but overall feels well-built. It’s not the tank-like build quality of the Bushnell Launch Pro, but it does feel slightly more robust than the FlightScope Mevo Gen 2.
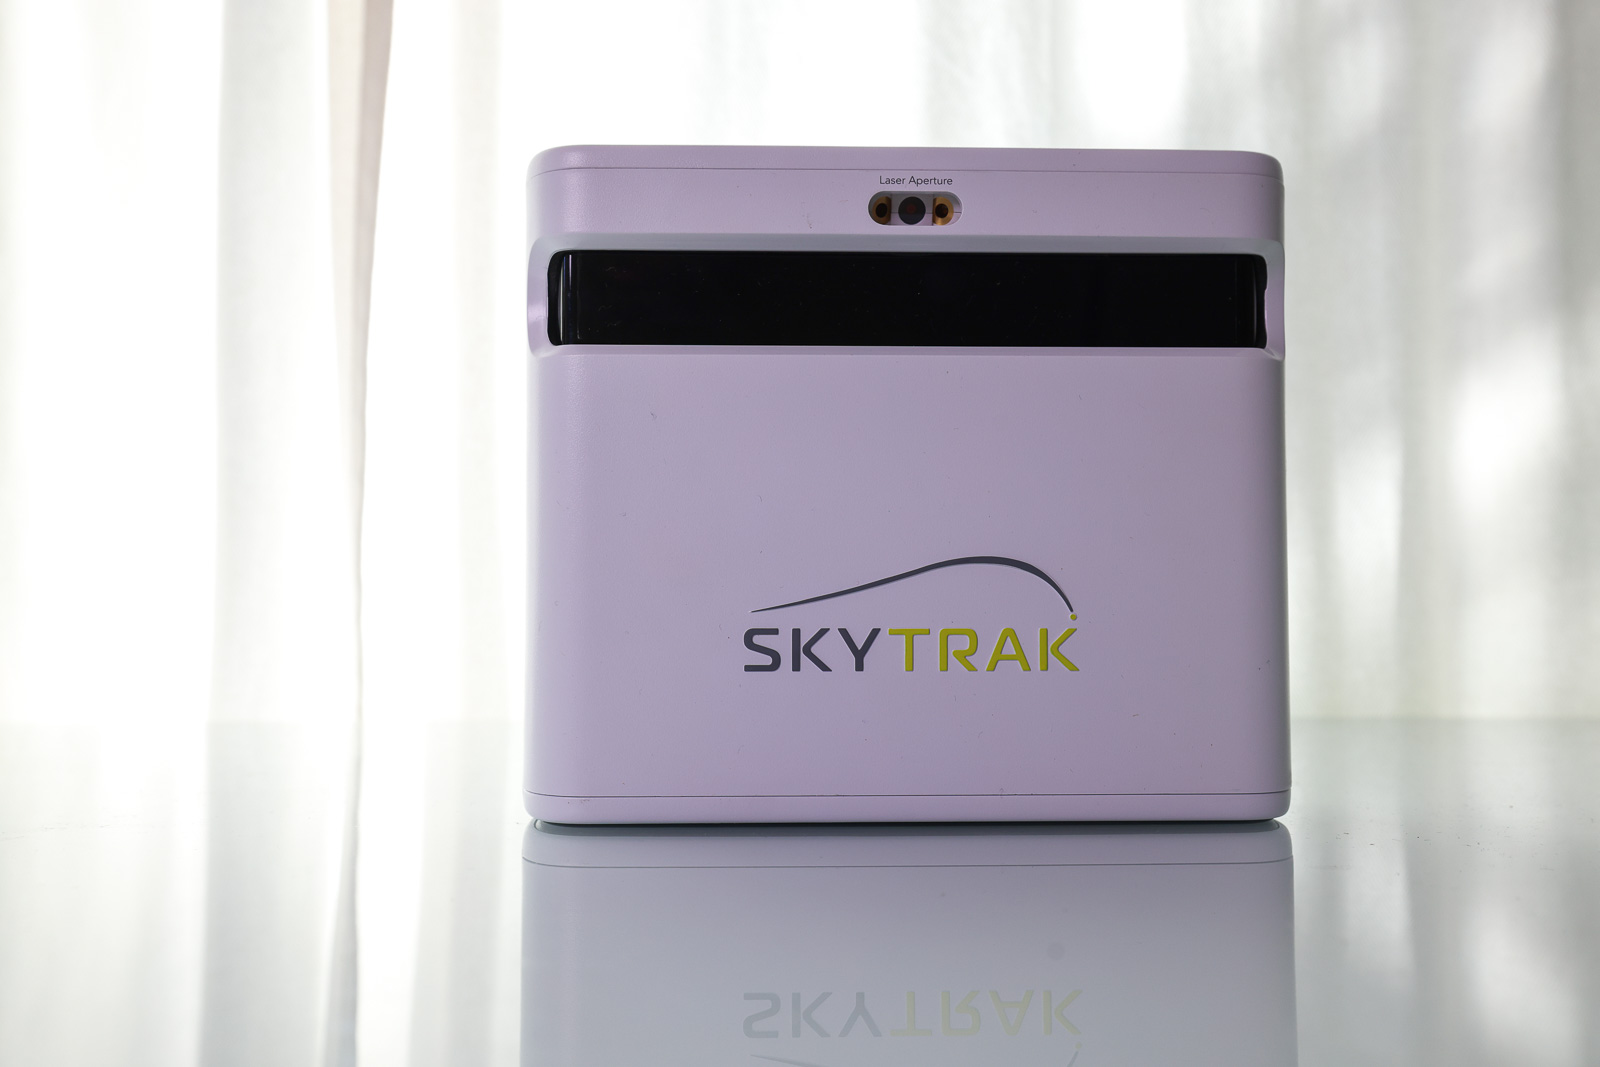
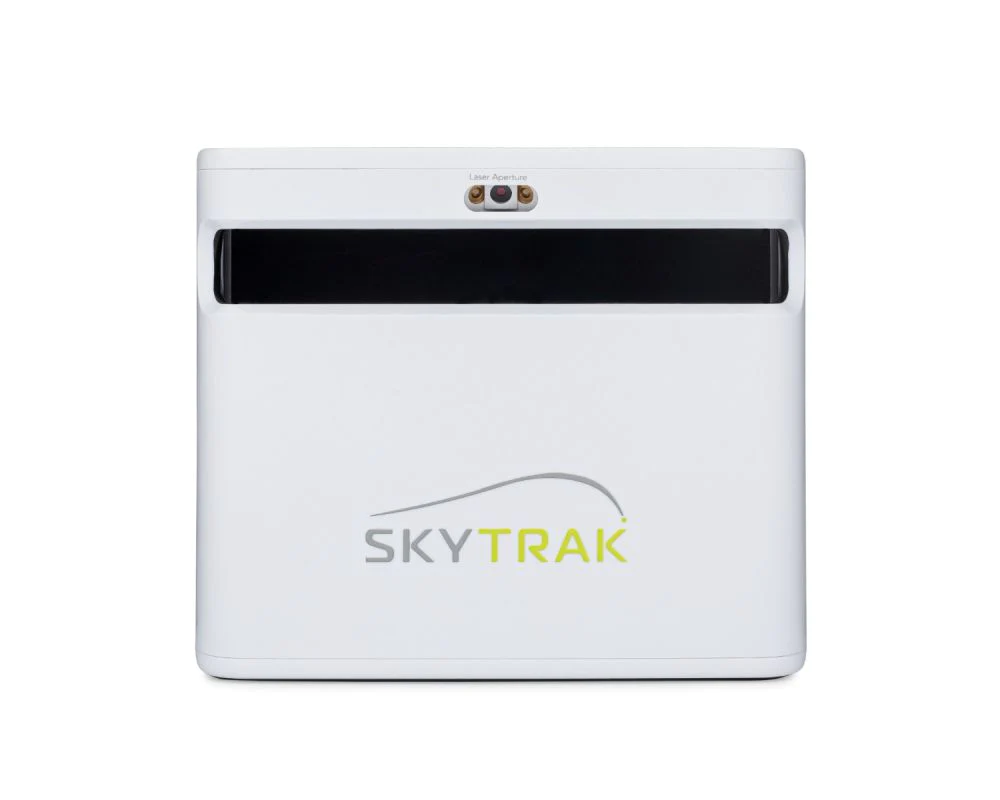
One of the main things that sets the SkyTrak apart from other competing models is the fact it uses a combination of a high-speed camera and Doppler radar to track your metrics.
The major benefit to this is the fact that you can use it in much smaller spaces. With Doppler devices like the Mevo Gen 2 or Rapsodo MLM2Pro you have to place the devices 7-8 feet behind the ball. Camera-based systems are placed right next to the ball. This cuts the space necessary to create a home simulator setup in half.
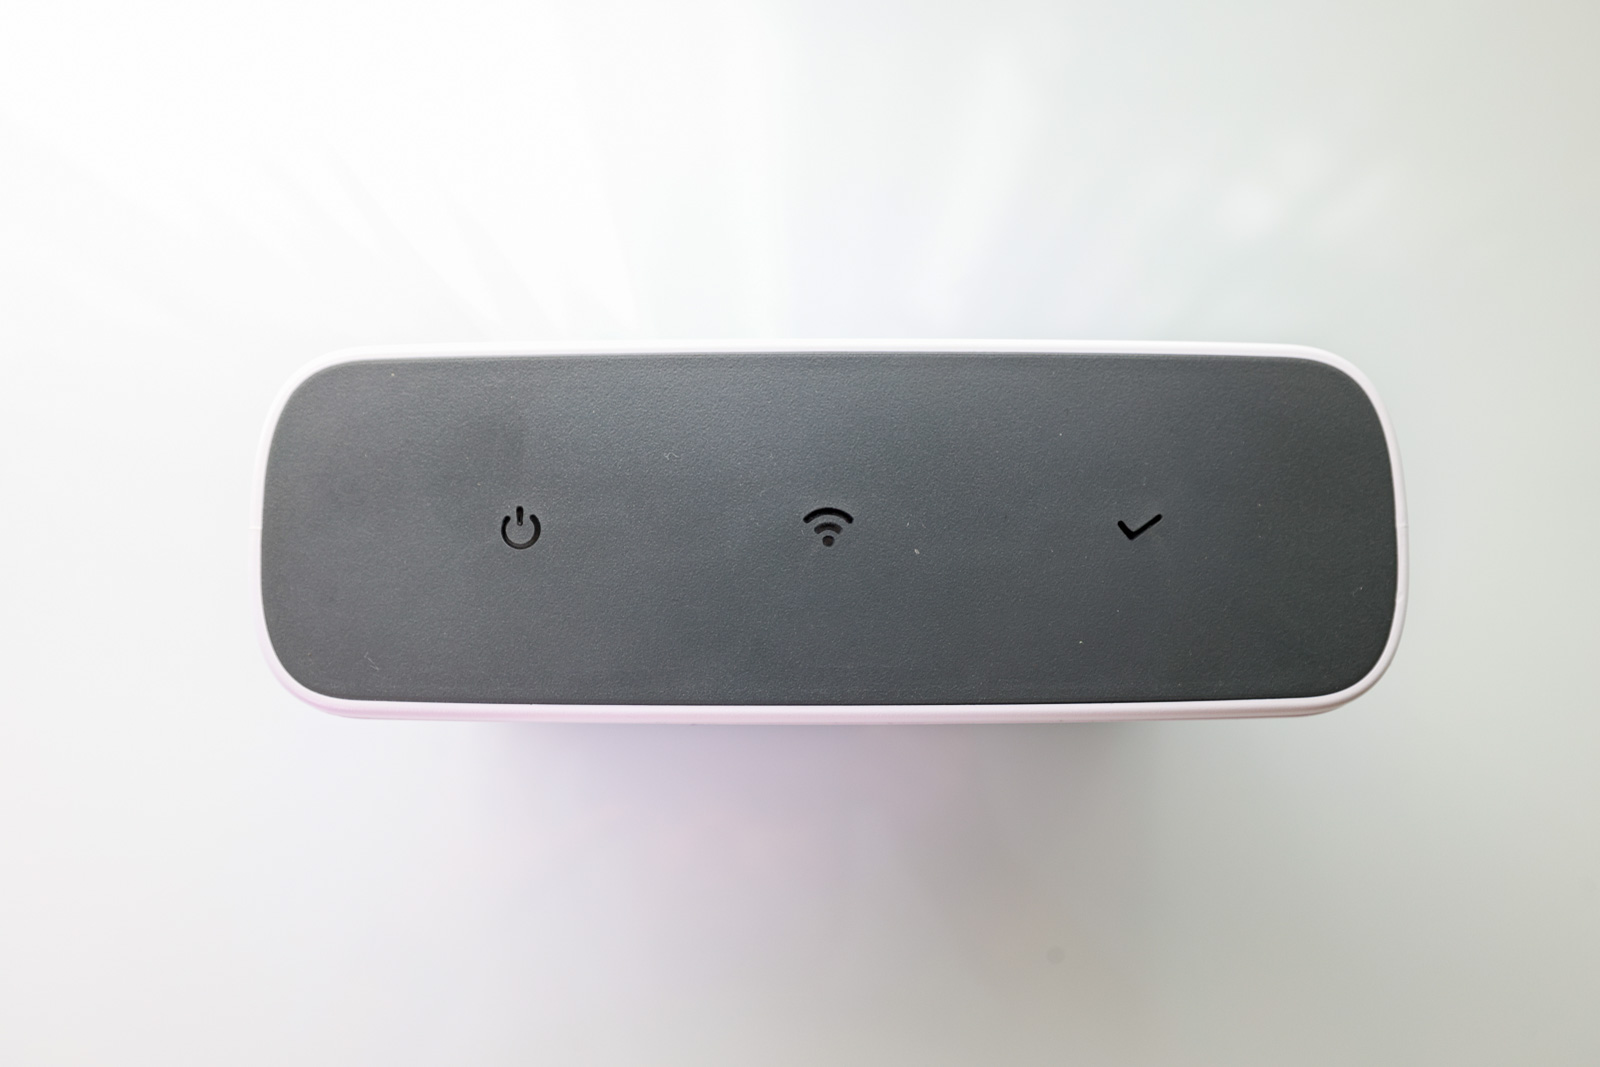
There are three indicators across the top of the device for power, WiFi and status. These change colors depending on the state the device is in, and I love how big and easy to read they are.
The SkyTrak Plus is a fairly heavy device, so it’s not necessarily something you’d be throwing in your bag and taking with you on a regular basis.
To that end, one of the major drawbacks to the SkyTrak+ is that it’s mostly an indoor-only device. But we’ll talk more about that a little bit later on.
Overall, my first impression of the Skytrak+ is really positive. It’s well-built, well designed, and it has the look and feel of a high-end launch monitor.
But that means nothing if it doesn’t perform as well. So does it?
If you're looking specifically for a home simulator that's easy to use, fun, and accurate? The SkyTrak+ may provide the very best experience out there for the money. It's basically the same thing as the new SkyTrak ST MAX for a lot less money. And now that you can find the SkyTrak+ at a deal price while it remains, it's even more compelling.
Setting up the SkyTrak+ Golf Simulator
One of the nice things about the SkyTrak+ unit is that it can function on iOS, Android, or PC.
With any of the more expensive launch monitors out there, I’d plan to set aside at least an hour to get everything set up before you plan to use it.
That’s about how long it took me to be totally good to go with the SkyTrak+.
During this time, you’ll:
- Create your SkyTrak account
- Download mobile and PC versions of the software
- Install the most up-to-date firmware
- Pair the SkyTrak+ to each of your devices
It can certainly take less time than that, especially if you’re only using it on PC or mobile and not both. But regardless of which way you go, there is some setup involved.
The good news is that it’s all pretty straightforward, and I didn’t have any unexpected issues with the setup.
There are two primary ways to pair the SkyTrak+: via USB or direct via WiFi connection.
The USB-C solution with my PC worked great, and had me connected in seconds. I also appreciate that the SkyTrak Plus uses the more modern USB-C connector rather than older USB iterations.
As I’ll talk about a bit later, the new SkyTrak ST MAX adds a second USB port that allows users to transmit data and charge the device at the same time. That’s a nice advantage for permanent setups, but as I’ll discuss, I’m not so sure it’s enough of an upgrade to justify the significant price difference.
The WiFi setup is also pretty seamless, although I do wish there were a Bluetooth option.
As I’ve talked about in both my Mevo+ and Rapsodo MLM2Pro reviews, if you’re using an iPad without cellular, you’ll run into a major annoyance.
Namely, in order to connect your iPad to the SkyTrak+, you have to connect it to the WiFi network emitted by the device – which doesn’t have any internet access.
So once you do that, you effectively don’t have internet available to your device. So if you need to download courses, pair accounts, or do anything else online, you’ll need to disconnect from the SkyTrak+, connect to the internet, and then reconnect.
It’s not the end of the world, but every time I have to go through this with any device I get a little annoyed.
So for the most seamless solution, I definitely prefer the PC and USB connection.
That said, once accounts were created and everything was setup properly, each subsequent use of the SkyTrak+ app was extremely smooth. Within about a minute of turning on the device, I could be connected via either my PC or iPad and be ready to rock.
Positioning the Device
The best part about having a camera-based device is that they are so much easier to position than Doppler-based devices (note: the SkyTrak has both camera and Doppler built in).
The FlightScope Mevo Gen 2 has been my pick for “best overall launch monitor”. But my biggest complaint with it is that you really need to spend 2-3 minutes dialing in its positioning in order to ensure you’re getting accurate data.
With the SkyTrak+, you set it down 18 inches to the side of the ball and a red laser dot is emitted on the ground. You put the ball on the laser, and away you go.
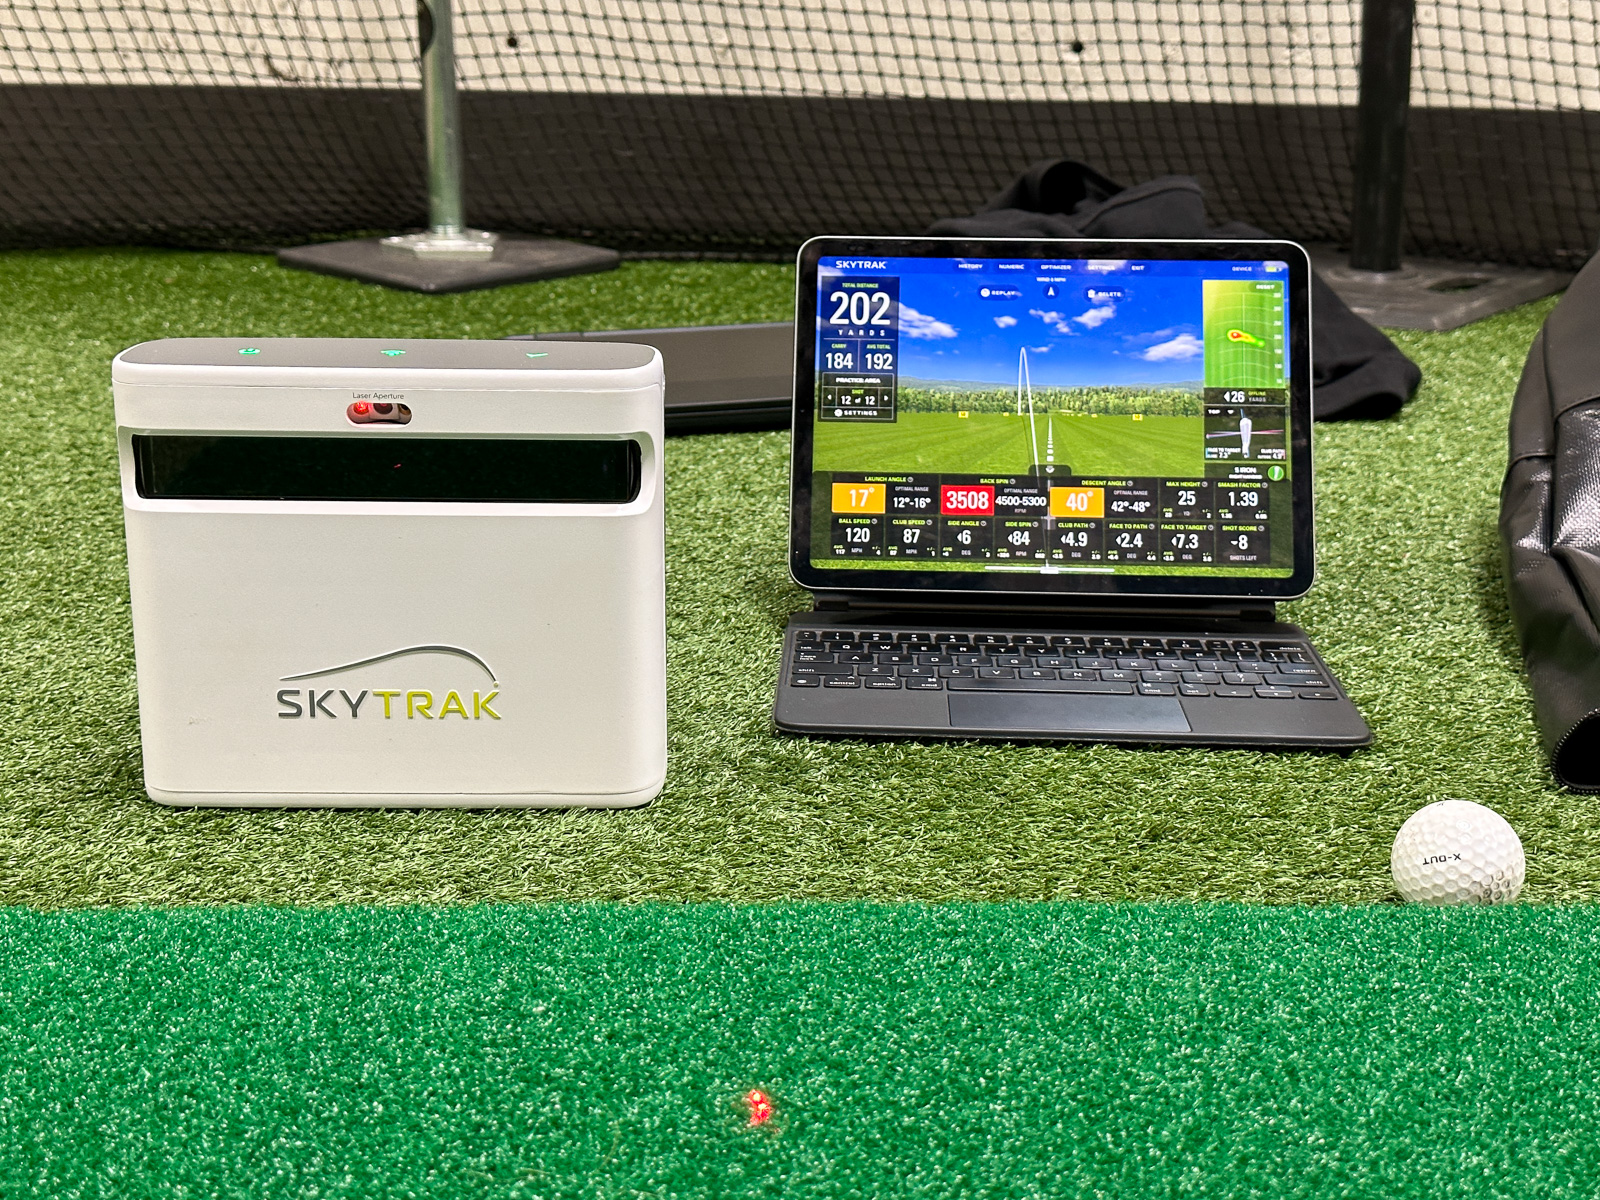
It’s fast, easy, and accurate – I love it. You could say the same about the Bushnell Launch Pro Circle B, but despite not having the built-in display of the Bushnell, overall the SkyTrak+ is easier and more seamless to use.
The SkyTrak+ Software
After many sessions using the SkyTrak+ software, I’ve gotta tell you, I’m falling in love.
It works equally well on both iOS and PC, and the PC version has felt less buggy than other simulator software I’ve tested recently – specifically Golfzon Wave and Foresight.
I’ve said for a while now that FlightScope has my favorite software of any launch monitor. I think this is still true. It gives you more customization options, more data (depending on your package), and is really easy to dial in exactly the way you want it.
But, and this is a big but…
The SkyTrak+ software looks better and is easier to use.
I was really pleased to see how good the SkyTrak software looks.
It really feels like a modern interpretation of simulator software which can often feel a little outdated with some other brands.
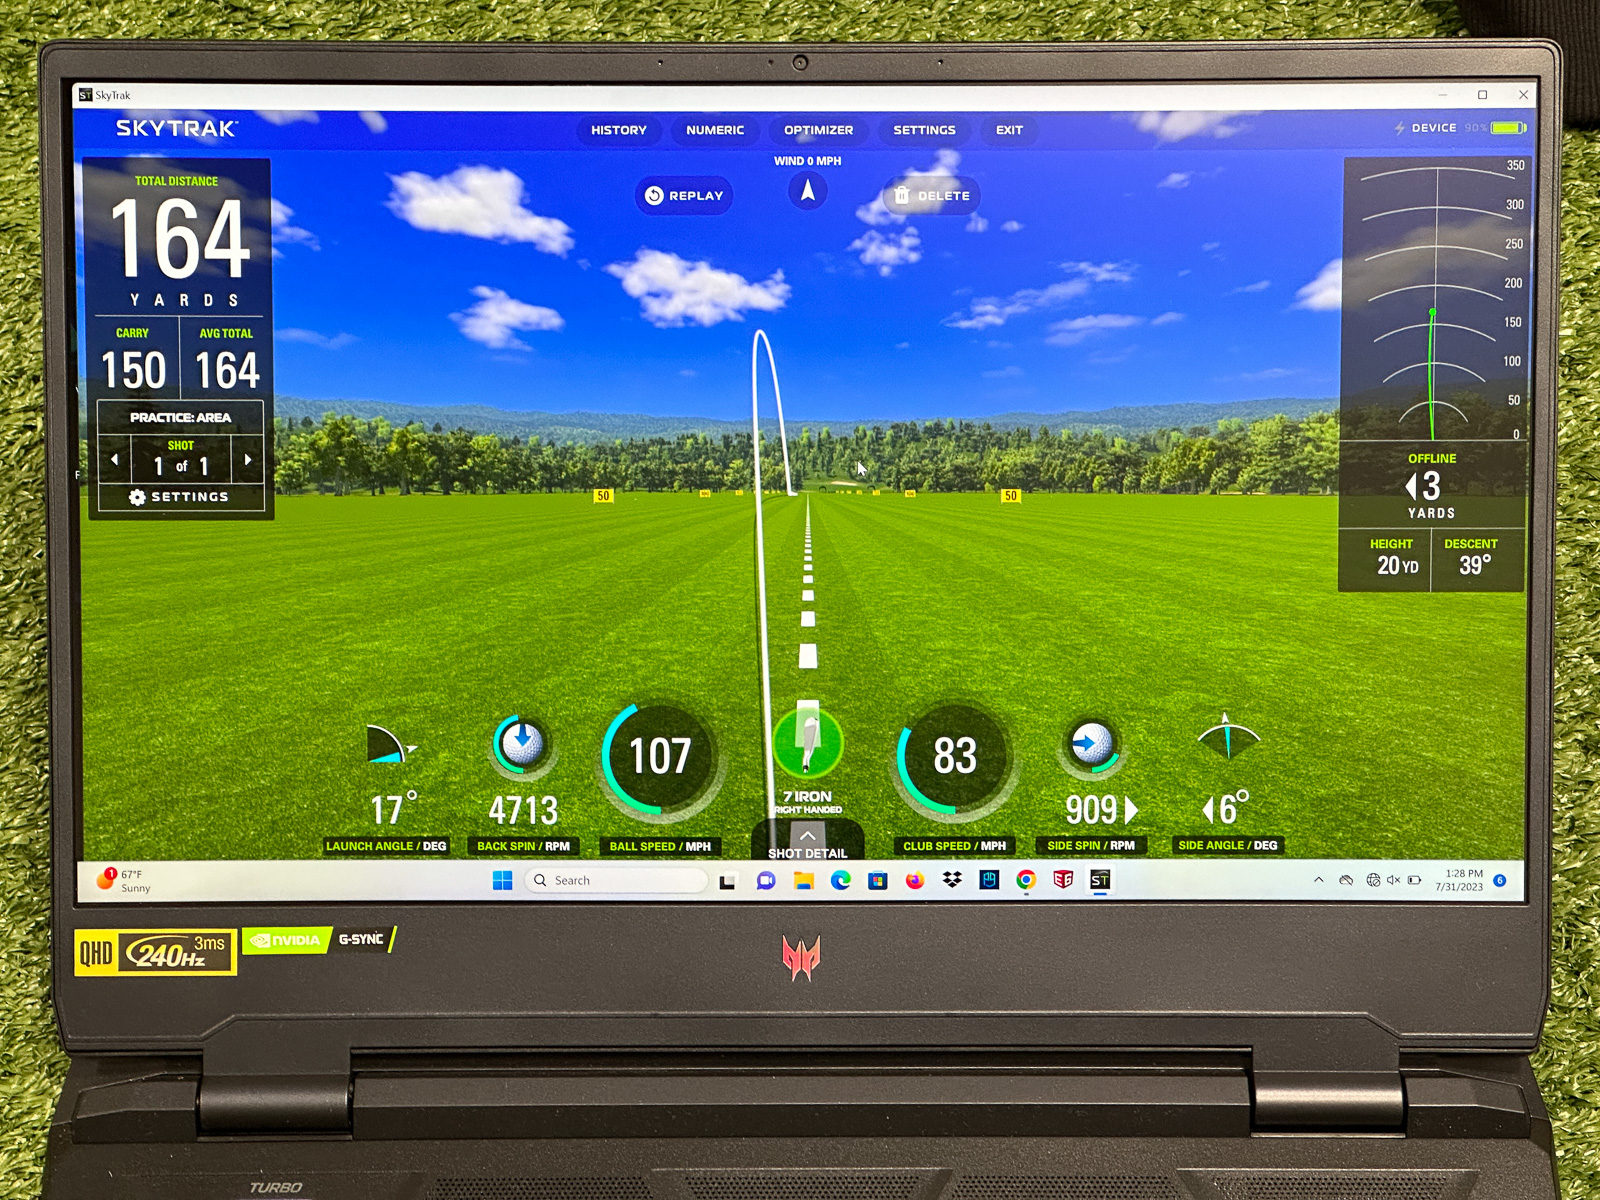
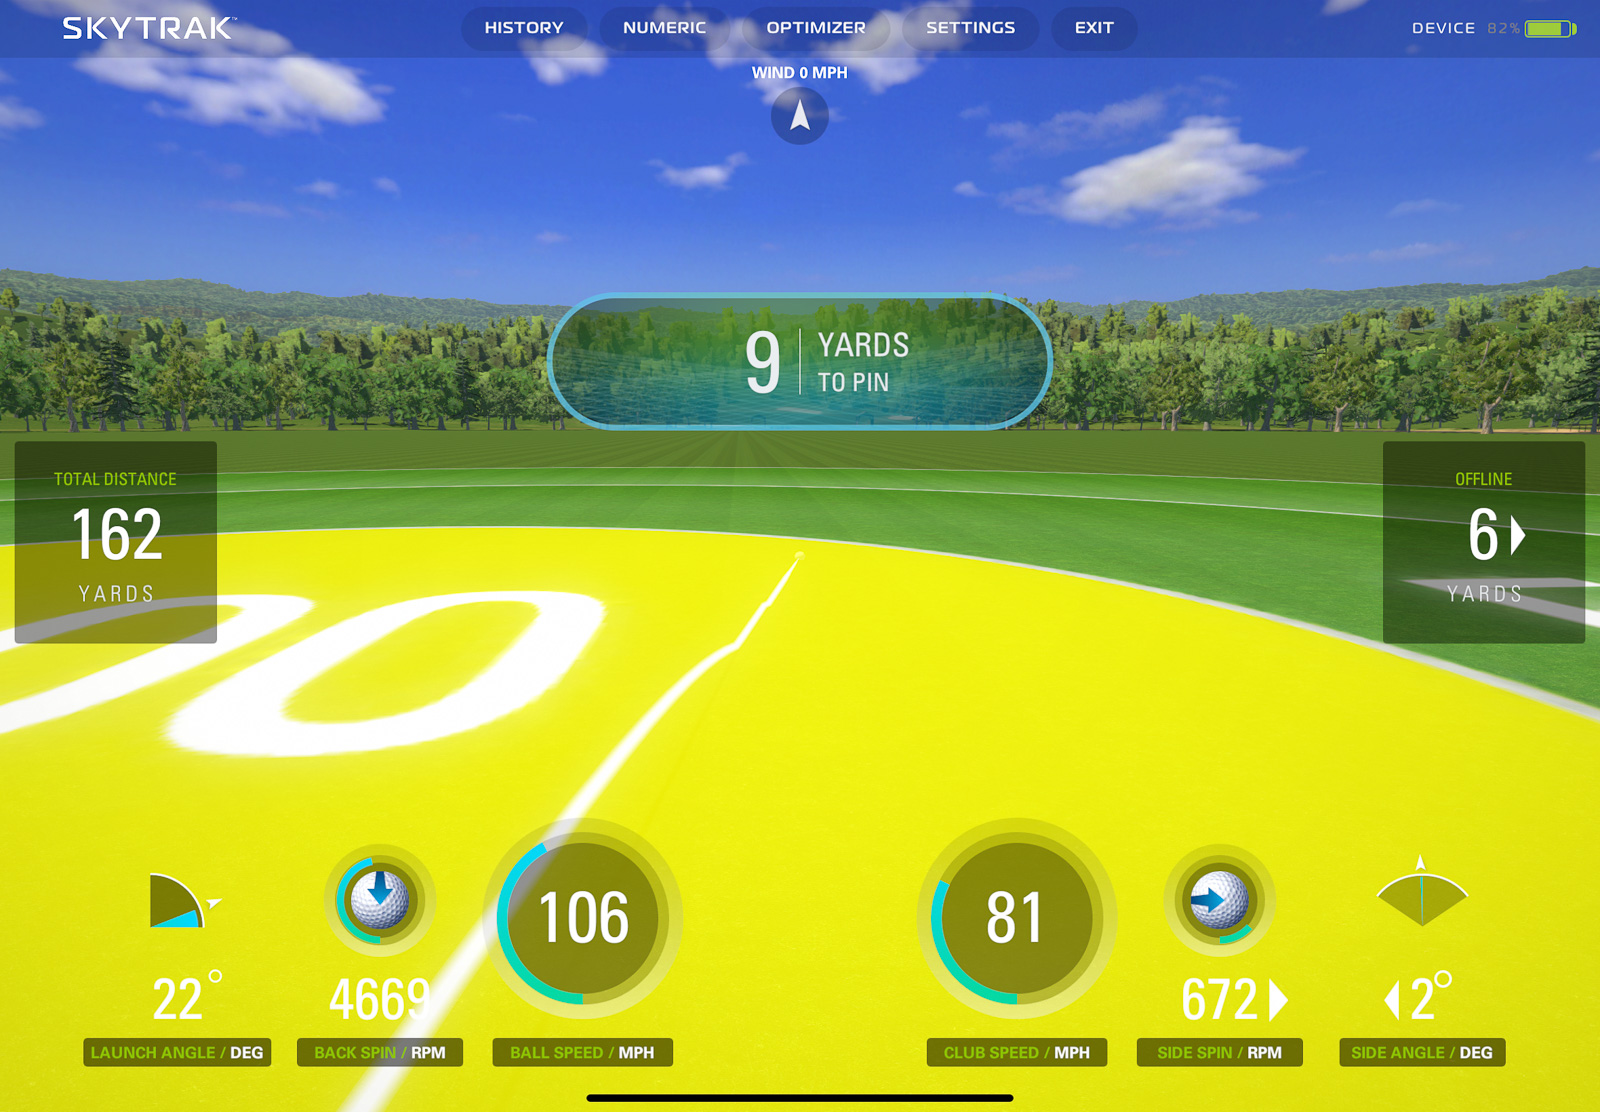
The default view shows you some basic metrics like launch angle, carry distance, ball speed, club speed. and both back and side spin rates.
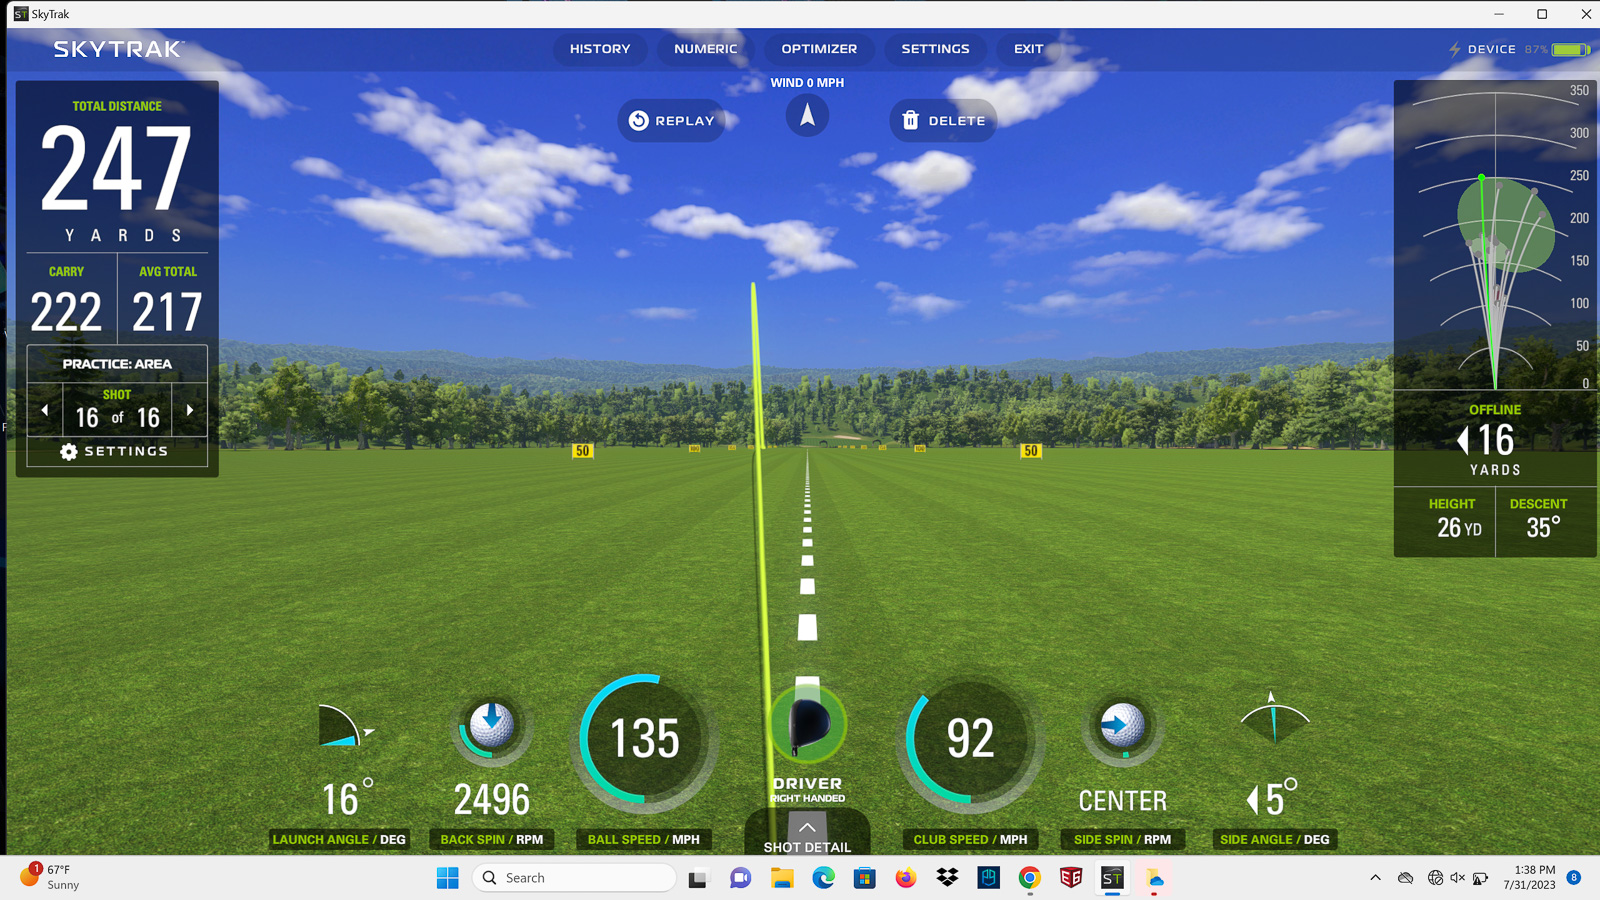
But one click into “shot details” opens up a whole new world of data, that makes it very easy to get all of the metrics you need.
One feature I personally love is the fact that it will give you a green, yellow, or red box for launch angle, spin rate, and descent angle.
These colors tell you if you’re within the “optimal range” for each of these metrics for your specific shot.
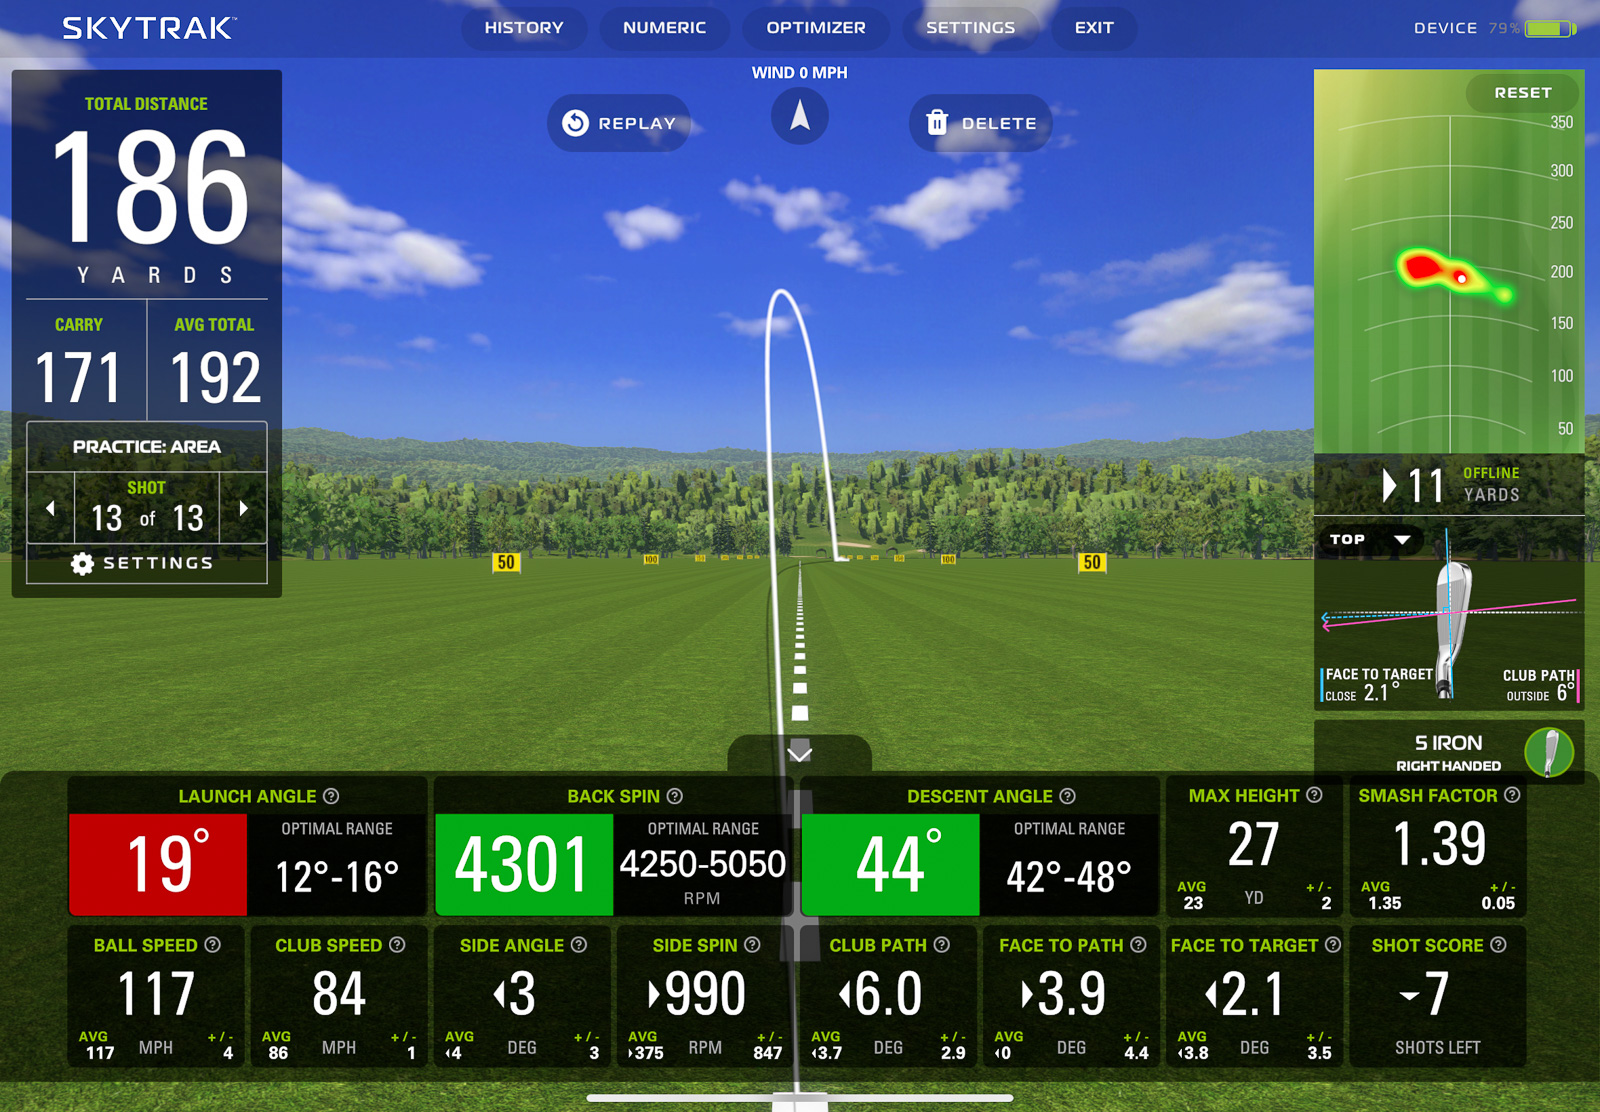
While yes, the “Optimal” numbers should be different for everyone, having an easy visual reference for people new to shot statistics is extremely relevant and helpful.
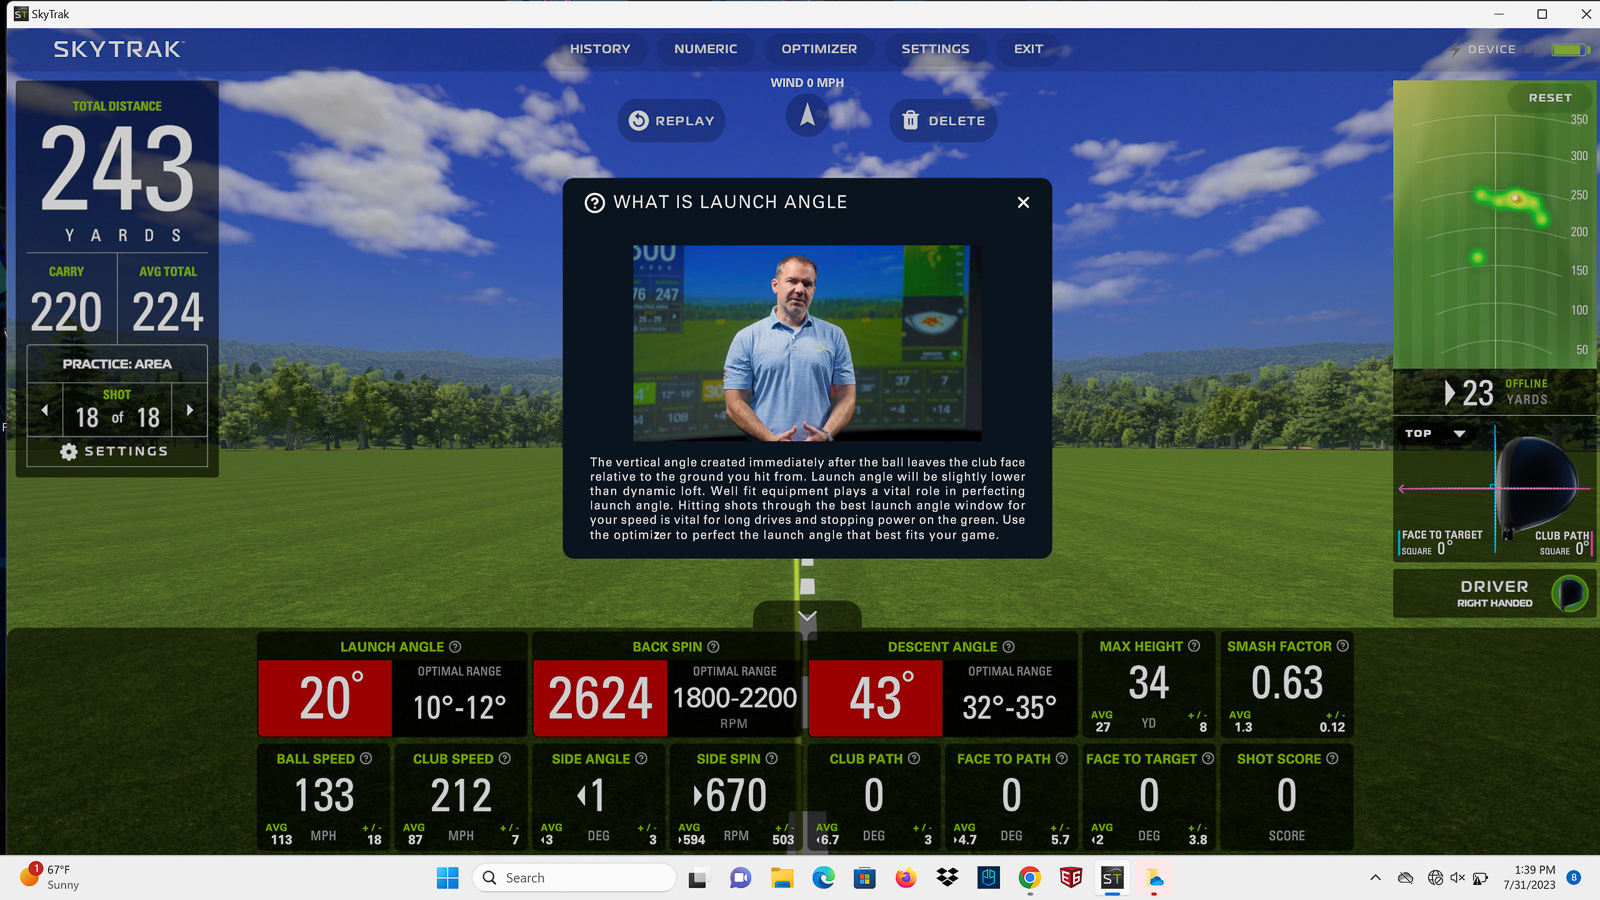
SkyTrak+ takes it a step further, as every single metric display also has a little “i” information icon. Click it, and it opens up with a video and description detailing exactly what this metric is and what you should be trying to attain when considering it.
If you don’t care about seeing your shot tracer, you can switch over to “Numeric Display” mode, you’ll get a full-screen chart showing all of your metrics.
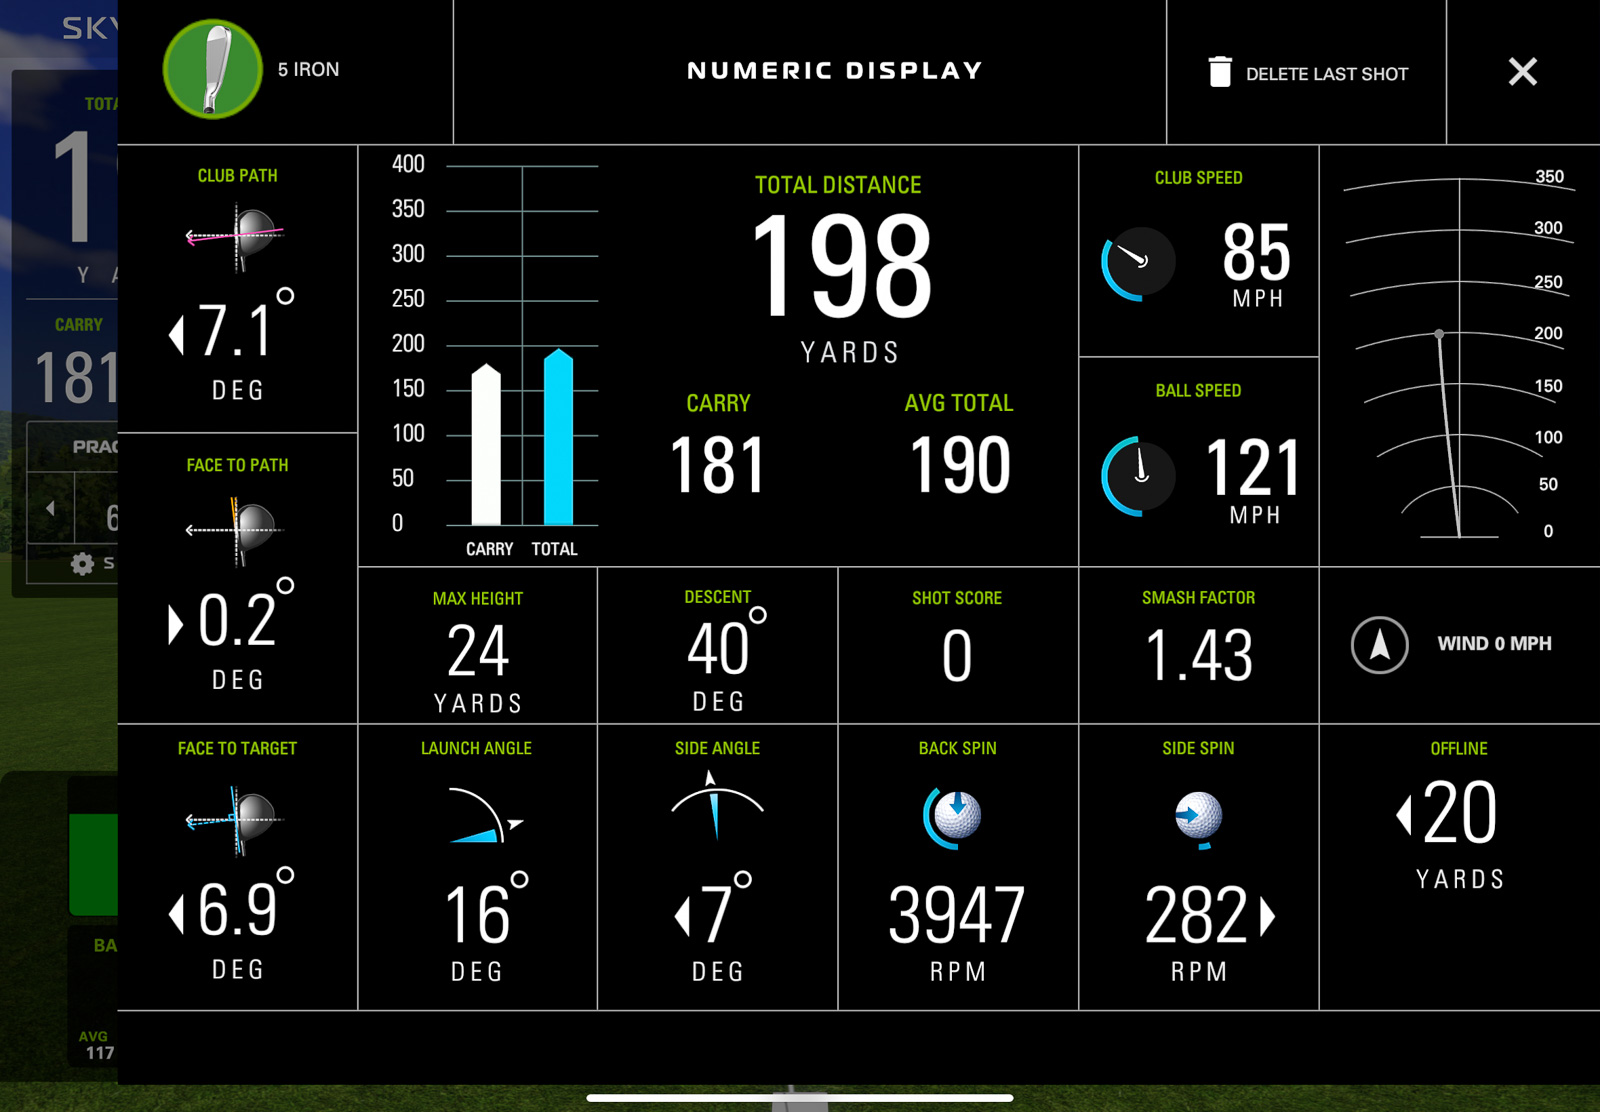
I’ve celebrated how well the FlightScope Mevo Gen 2 does this within their software, but honestly, I think the SkyTrak+ looks better than the Mevo implementation of it.
SkyTrak strikes the perfect balance between giving you all the data you need, while still being user-friendly.
And with the 5.0 update released in mid-2024 – the software added a few BIG features, we’ll get to in just a minute.
SkyTrak+ Modes: Practice, Challenge, and Game Improvement
This is the part where some of you will let out a big groan, but before you do, hear me out.
There is a subscription fee with SkyTrak+.
Technically, you can use the device without subscribing and you’ll get basic practice range functionality with all the shot data.
But let’s be real: You’re going to want more than just the bare-bones range if you’re buying a device like this.
The Essential Plan at $129.99 a year unlocks all the game improvement features, practice modes, and tools that make the SkyTrak+ software really shine.
Then, if you want simulator access to SkyTrak’s native sim software, Course Play (which I’ll talk about much more in-depth in a moment), you have three options:
Core Foresight at $299.99 a year includes Essential plus a library of sim courses created by Foresight Sports.
Core Trackman at $349.99 annually includes Essential plus a library of Trackman courses.
Elite at $599.99 a year includes Essential plus both the Foresight and Trackman libraries.
I’m going to go through what each of these includes in more depth in just a second. But overall, it feels reasonably priced for what you get, especially compared to some competitors.
One thing worth noting upfront is that SkyTrak has discontinued official support for third-party simulator platforms. I’ll talk more about what that means later, but the short version is that Course Play is now your primary simulator option.
First, let’s look at what each of these packages get you.
SkyTrak Practice Range (No Subscription Required)
SkyTrak+ comes with access to the Practice Range. As I explained in the “Software” section above, the SkyTrak Practice Range is fantastic.
It looks good, the metrics are easy to read, and it has most of what you’d like to see it have.
One big omission you’ll find is there is no Face Impact Detection like you can get with the Mevo Gen 2, but it does have all the D-plane information such as face-to-path, face-to-target, swing path etc that you have to pay $1k extra for with FlightScope as part of the Pro Package.
If all you care about is practicing and grinding on your game, the Practice Range with the SkyTrak+ is one of the most enjoyable ways to do it.
But here’s the reality.
Considering the SkyTrak+ is primarily an indoor device, you’re likely setting it up at home. If you’re spending $2K+ on it, you’ve also most likely got a hitting net or impact screen, and a projector with a full simulator setup.
If you’re going through that much work and decide the SkyTrak+ is the right unit for you, then 99% of you will spend the extra money to get all of the extra stuff.
And you should, because you’re getting some very useful tools that you don’t get in other places.
Essential Plan Features ($129.99/Year)
The Essential Plan package really opens up some genuinely useful software features of the SkyTrak+ that go beyond just being gimmicks. These modes are handy for both improving and understanding your own game.
Some of the modes it unlocks are:
Bag Mapping
This is hands down the most intuitive implementation I’ve seen of bag mapping.
Essentially this is a very detailed process where you tell it what your intended distances are, and then it walks you through hitting all of the clubs in your bag.
It will show you the average distances and dispersions for each club.
At the end, it will show you what all of your average yardages are, and make it very easy to see where there are gaps. Maybe the 10-yard difference you were expecting between your 6 and 7 irons is actually a 17-yard difference.
With this information, you can make adjustments to your clubs or your shots on the course to get your yardage gaps in line with where you want them to be.
The fact SkyTrak makes this so easy to do is huge, and genuinely helpful.
Skills Assessment
This is the next obvious section to work on after you’ve gone through the bag mapping process.
It evaluates how good you actually are with each club. You’ll set your desired distance for each club, and then hit a series of target-based shots.
At the end, it will show you how accurate you were and give you a dynamic handicap for each club.
So maybe you’re a 4hc with your pitching wedge, but you’re a 14 with your 4 iron.
This helps you really pinpoint what you need to work and shows the strengths and weaknesses of your game.
To me, it feels like a simulator version of what Arccos Caddie data gives you after your rounds.
Personally, I’ve found the on-course data to be a little bit of a better representation of my actual game. However, this is mostly just due to the fact I’ve always struggled with truly being able to play and swing the same as I do on the course, in a simulator.
Regardless, doing this on a regular basis will allow you to track your progress and see improvements over time – which I love.
Wedge Matrix
Again, this is another genuinely useful mode that I haven’t seen on other devices I’ve used.
In the Wedge Matrix mode, you’ll select 4 of your wedges and then hit shots at full, 3/4, 1/2, and 1/4 swings with each of them.
You’ll then be able to see yardages for each, which helps you know what the correct club is for all of your pitch and chips shots on the course.
Maybe you thought at 100 yards a 3/4 PW was the right play, but the reality is a full gap wedge is more consistent.
Challenge: Target Practice, Closest to the Pin, Long Drive
Along with the modes mentioned above, when you get the “Game Improvement’ subscription, you’re also getting access to three challenge modes:
- Target Practice
- Closest to the Pin
- Long Drive
These are all pretty self-explanatory and similar to many other launch monitors that have similar modes.
You can select if you want the challenges to be based on 3 or 6 shots, and you’ll get points for the accuracy or length of your shots.
The modes work pretty well, but I can see them getting a little old after a while if this were all you were doing.
If you're looking specifically for a home simulator that's easy to use, fun, and accurate? The SkyTrak+ may provide the very best experience out there for the money. It's basically the same thing as the new SkyTrak ST MAX for a lot less money. And now that you can find the SkyTrak+ at a deal price while it remains, it's even more compelling.
SkyTrak+ Course Play: A Wonderful New Inclusion with the 5.0 Software Update
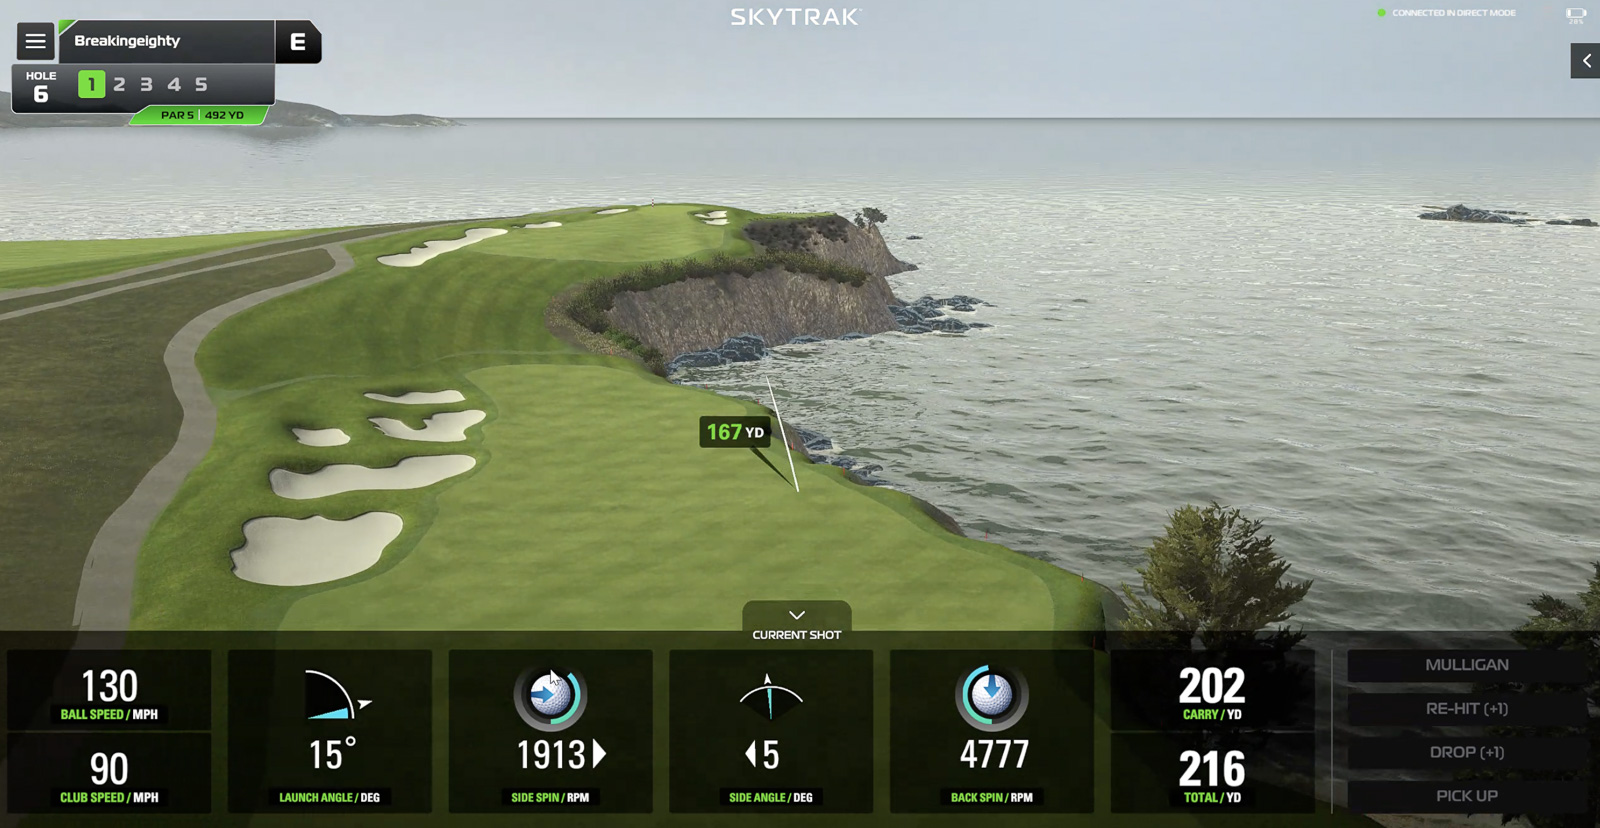
Earlier in 2024, SkyTrak did a massive update to their PC software in the form of the “5.0 update.”
The biggest new feature?
Built-in simulator access.
This was my number one biggest critique of the SkyTrak Plus when it first came out. I loved the user-interface so much, that I wanted to be able to use it while playing simulated rounds. E6 is fine, but I’ve never loved the user experience.
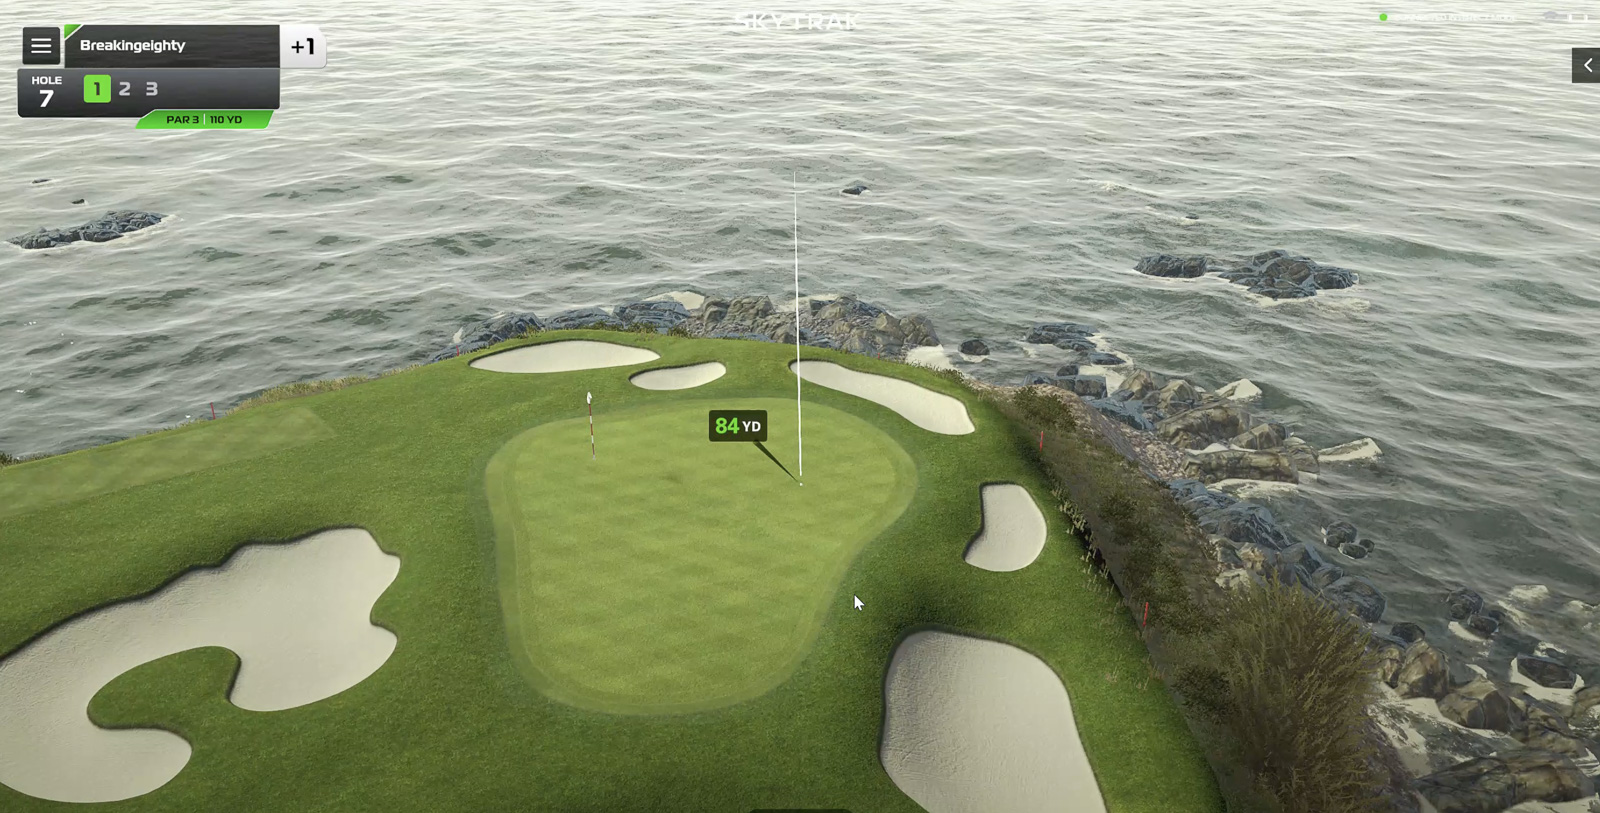
Now with the new Course Play subscription options, you can., And they’ve absolutely nailed it. The courses look fantastic, the integration is seamless, and the whole experience just works really well.
Then, in 2025, SkyTrak partnered with both Trackman and Foresight Sports to offer their premium course libraries inside the SkyTrak ecosystem.
That means you’ve now got options within Course Play.
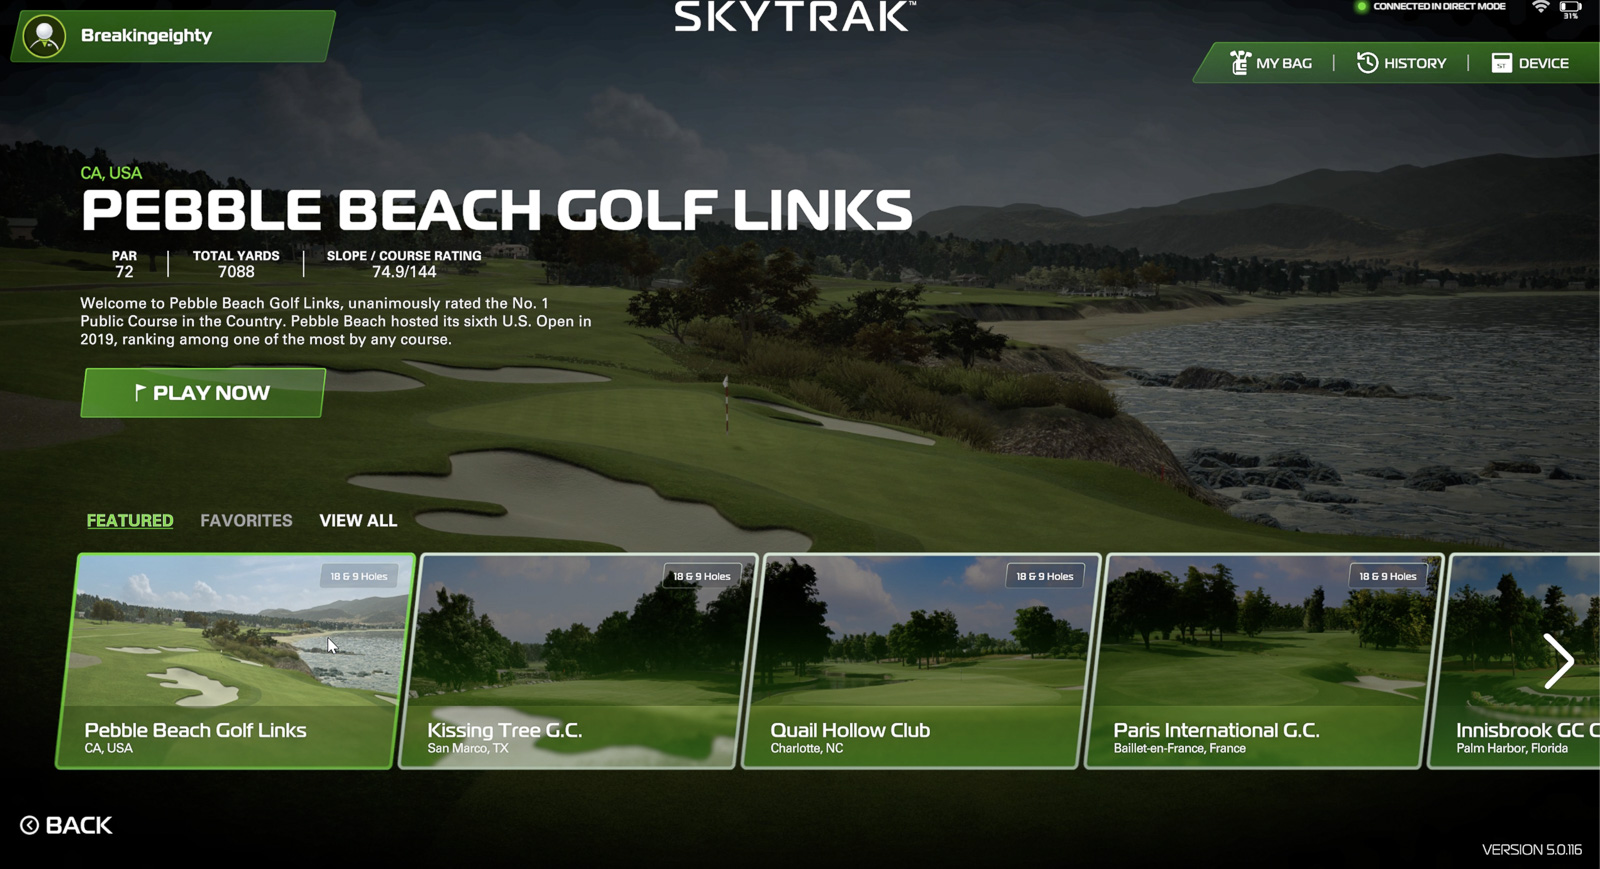
The Foresight library, for $299.99 a year, has 38+ courses, including Pebble Beach, Kingsbarns Golf Links, Coeur d’Alene Resort, Banff Springs, Muirfield Village, Congressional Country Club, and the Doral Blue Monster.
Plus you get a new course each month, so the library keeps growing.
Then you’ve got the Trackman library, for $349.99, which has 39+ courses with heavy hitters like Pebble Beach (yes, both libraries include it), Bethpage Black, Royal Portrush, Quail Hollow, Le Golf National, and Sweetens Cove.
And like with Foresight, you get one new course monthly.
Worth noting that the Trackman package includes the full Pebble Beach Resort course pack (Pebble, Spyglass Hill, Spanish Bay, and The Hay), which is a nice bonus that makes the extra $50 over the Foresight package feel worth it.
Finally, you’ve got the all-in package for $599.99 a year that gets you all the Foresight and Trackman courses.
Like I said, this whole Course Play native sim software is an awesome addition to the SkyTrak platform.
A Big Bummer: No Third-Party Support
On the flip side, they no longer support an official connection to third-party software like E6 and GSPro. That may be a bummer for some people. Existing SkyTrak+ customers still get a connection, but nothing for new customers.
Considering this is obviously technically possible, and thousands of existing customers can still do it? This is a tough pill to swallow, especially for people that were hoping to use GSPro.
There probably are workarounds, but I wouldn’t count on it. For most people, Course Play is now the path forward.
A Plus: Support for Mac
Despite the downside of not allowing third party support, there is a bright spot: Mac support.
SkyTrak is the only major launch monitor I’ve tested that has native first party software support for Macs.
If you’re like me and you use a MacBook Pro and hate the idea of shelling out for a gaming PC? This is a HUGE deal, and might be the single best reason to pick up a SkyTrak unit over something else.
I’ve also been surprised by how well the 5.0 software runs on my M1 Max Macbook Pro, which is over 4 years old at this point.
Is the SkyTrak+ Accurate?
In my recent video update (see the top of this review), I compared it directly to a Trackman – and over all the results were great.
Clubhead speed, carry distance, and spin were all right in line across my gap wedge, 7 iron, and driver.
The biggest issue, however, was side carry. It seemed like the SkyTrak+ doubled(ish) whatever number I got from the Trackman.
I’m going to do more testing here, but that was one anomaly that could definitely have issues when playing simulated rounds.
One noticeable issue is that the SkyTrak+ doesn’t inlude angle of attack. This is one of the most important metrics many golfers use when practicing, so to have a device that costs 2 grand, not have this? Feels like a weird omission.
SkyTrak has said a future update would provide it, but considerign the new ST Max also doesn’t have it – I wouldnt hold your breath.
But overall, the latest updates have the SkyTrak+ feeling as accurate as much more expensive units.
Putting with the SkyTrak+
One area that isn’t quite as robust as some other simulator solutions is putting. It’s usable enough to play simulated rounds with the SkyTrak+, but it doesn’t give nearly as much data and isn’t as accurate as the Launch Pro. Even the Mevo Plus has a built-in putting practice mode, which while it’s barebones, is more than what the SkyTrak+ has.
If putting is of primary importance to you? Well then, you should probably not be using a simulator ha.
But jokes aside, if you want your putting experience to be as good as possible, then you might look at the Golfzon Wave. It comes with an infrared putting mat, that makes for the absolute best-putting solution of any home golf simulator under $5k.
Why the SkyTrak+ Is Still a Better Buy Than the New ST MAX
So I mentioned earlier that SkyTrak has released their newest launch monitor model, the ST MAX.
And it’s great.
Problem is, it’s pretty much the exact same thing as the SkyTrak+.
I mean there are a few nice ST MAX additions, like swing speed training, that second USB port I mentioned earlier, and a slightly faster processor.

But the ST MAX costs $2,995. And right now, PlayBetter is selling what remains of the SkyTrak+ for $1,995. So that means you’d have to pay an additional $1,000 if you wanted those few extras that the ST MAX offers.
I really don’t think that price difference is worth it. I’m not saying the ST MAX isn’t worth $2,995. I think it absolutely is. What I’m saying is that I think if you can get a SkyTrak+ for $1,995, you’ll have gotten a steal.
Also, word is that the SkyTrak+ will continue to be supported. And when you think about it, there’s no way that GolfTec and SkyTrak are going to bail out on all of those customers and users, so I think you should be fine.
I don’t know how many SkyTrak+ units are still available. I just know that they aren’t going to make more of them. So if you’re thinking about going with a SkyTrak+, I wouldn’t wait too long.
Final Thoughts on the SkyTrak+ Launch Monitor and Simulator
Simply put, I’m incredibly impressed with the SkyTrak+. Much more so than I expected to be if I’m honest.
If you’re just looking at the practice experience, I think it’s probably my favorite of all the launch monitors out there.
The design is clean and modern, it’s beginner-friendly, and it gives you all of the data that you need (except the odd omission of angle of attack).
Accuracy is very good and on par with other launch monitors in its price range. But the kicker here is that the SkyTrak+ is also easier to setup than many of its competitors as well.
But as we all know, there’s no such thing as a perfect simulator.
If you primarily hit off a grass range, the fact that you won’t be able to use this is a bit of a bummer (it’s fine outdoors off mats).
But the good outweighs the bad here by a long shot.
I am thoroughly enjoying using the SkyTrak+. Especially how easy it is to use, and how modern the user interface is.
Throw in the 5.0 update that added Course Play, and SkyTrak+ is making a stronger case than ever to being one of the best launch monitors under $3k.
So if you’re looking for a home golf simulator that’s easy to set up, accurate, doesn’t need a lot of space, and most importantly, is really fun to use? The SkyTrak+ is one of the very best options on the market.
If you're looking specifically for a home simulator that's easy to use, fun, and accurate? The SkyTrak+ may provide the very best experience out there for the money. It's basically the same thing as the new SkyTrak ST MAX for a lot less money. And now that you can find the SkyTrak+ at a deal price while it remains, it's even more compelling.
This page contains affiliate links. This means that if you click a link and buy one of the products on this page, I may receive a commission (at no extra cost to you!) This doesn’t affect our opinions or our reviews. Everything we do is to benefit you as the reader, so all of our reviews are as honest and unbiased as possible.
I've spent hundreds of hours reviewing golf launch monitors. Take my quick 30 second quiz and I'll tell you which one is right for you!
Recent Updates
January 7th, 2025th: A full re-review of the SkyTrak+. Specifically to compare to to the new SkyTrak ST Max, which is the newer version of this unit. Also updated to reflect new software features, a new pricing strategy, and the continued lack of Angle of Attack.
One of the Best Home Simulator Options Available
The SkyTrak+ software is modern and fun to use. Setup is among the easiest among any launch monitors. The built in modes are both unique and useful. And now that they just released a first party simulator option, it's as good as it's ever been. No angle of attack however, remains an odd omission.
The Good
- Great setup process
- Excellent user-interface
- Accurate and reliable
- Mac Support
The Bad
- Subscription fee for any simulator use
- Can't use outdoors on grass
- No Angle of Attack
- No Third Party Support
-
Presentation
-
Performance
-
Quality and Features
-
Price
-
Personal Affinity
10 Comments
Hi Sean
Thank you for the review! I have been waiting for it for sometime!
– You didn’t mention the Network Mode connection which is the recommended option
– GolfTec (which owns SkyTrak) is now switching their centers to ST+
– You can use the unit outside on a mat or hitting of tees with accurate results
E6 does have the ability to play a number of formats (match play, scramble, stroke, stableford or best ball).
The biggest issue with the Skytrak is having left and right hand players. You have to move the Skytrak around or move from side to side when you have different handed players.
I don’t have the Skytrak plus but the original Skytrak. Have been using it for 3 years and hit thousands of ball and I purchase E6 yearly for $299.
Skytrak is not perfect but do enjoy the information garnered to help your game and the comoraderie and fun of having friends over to play during the winter months.
Right, if you buy a separate package it has all the stuff. I’m talking about what comes specifically with the SkyTrak+.
I know you mention in your review that skytrak+ uses high speed cameras, but doesn’t the skytak+ now use both high speed cameras and dual doppler radar? I didn’t hear mention of that in your review.
If its just a high speed cameras then it would just be essentially there original skytrak.
I believe the dual doppler radar is providing the club data and not just guestimates from all the high speed photos that are taken at impact.
Yep, you’re right and was an oversight on my part. The new + uses both Doppler and cameras.
I have 7 feet behind my mat indoors and 8-9 feet to the hitting area. Is this good distances for the SkyTak plus to work? I am looking for accuracy and ease of us to mostly work on my swing and have fun. I assume all the Doppler versions would not be a great fit!
Yep, you should be in good shape here! The SkyTrak+ is unique in that it’s one of the only systems to have Doppler that isn’t placed behind the ball. So you should have plenty of space for this unit to work well.
Hi Sean, I am looking to purchase a launch monitor and really like the MLM2 Pro. This has all I need apart from path and face to past data. Im thinking the next step up is the Skytrack Plus but this is three times the price. Is the club data measured on the ST+ or calculated like the R10? How accurate are they and do they justify the additional cost over the MLM2. Do you think Rapsodo will release an update that will include path and face to path on the MLM2 Pro in the new future.
Regards
Russell
I have taken my ST+ to the range. I am confused why you think it cant be used outside.
Did you use it on grass or on mats? Works great on mats, doesn’t work very well on grass.